The Challenge
Photographers often use telephoto lenses in the 400 – 800mm focal length range to photograph hummingbirds and other small wildlife. To help get good image size, close camera-to-subject distances of 15 – 25 feet are also often required. This presents some challenges that many photographers are not aware of. The exact point of focus on the subject is often critically important, focus itself must be critically accurate, the camera/lens must be rock steady, and regardless of aperture, the depth of field (DoF) will be surprisingly small. (Depth of field is the distance in front of and behind the point of focus in which the image appears sharp. If you want a basic introduction to depth of field and aperture, try this: A Beginner’s Guide to Aperture and Depth of Field.) I use specific strategies when shooting small subjects with long telephoto lenses to help bring home nice shots like this one of a Copper-rumped Hummingbird.
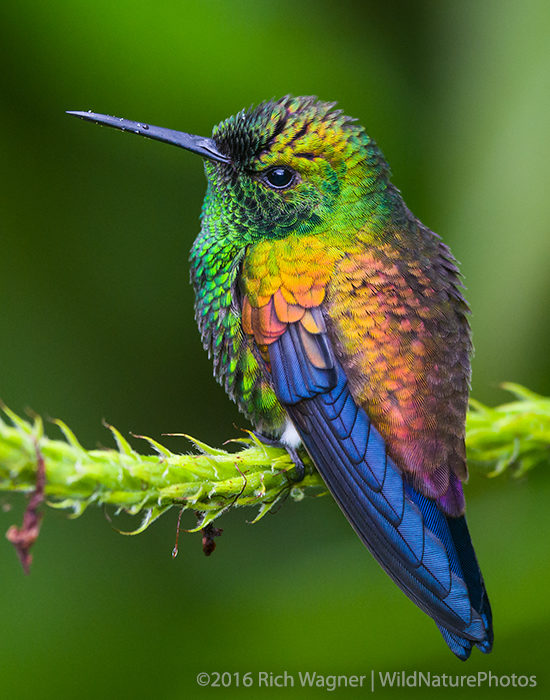
Copper-rumped Hummingbird (Trinidad)
This image is tightly cropped for the blog, to 7×9 inches at 300 ppi, to show detail. A close look at the pixels from a crop at 100% magnification from the original 36MP image shows excellent detail in all the feathers. (Right-click to download a larger image.) This photo was taken at 550mm (Nikon 400mm f2.8 + 1.4x Tele) at 1/100 sec, f5.6 at ISO 1000 with a Nikon D810 from about 25 feet, using balanced fill-flash on a vertical extender to help make the iridescent colors pop. The point of focus is just below the eye, and with this pose, the eye and almost all of the feathers of visual importance are in the same plane.
Even with a very slow shutter speed and nearly wide-open aperture, with minimal depth of field, the image appears sharp. This image could easily be used as a full-page or cover shot if not cropped so tightly.
The Problem
So what can go wrong? Here’s an example of the problem. I took the following image at the same 550mm focal length (400 f2.8 + 1.4x Teleconverter) at 1/200, f10, ISO 800 with a 36MP Nikon D810 from less than 15 feet on the same heavy Gitzo tripod, using fill-flash on a vertical extender. This is a JPG from a full-height vertical crop (3796 × 4912 pixels) from the 36MP image. (Right-click here to download a cropped 1:1 image)
Copper-Rumped Hummingbird (Trinidad)
In this image, the eye and body feathers are not in the same plane. Here is a close-up screen shot at 1:1. Focus is slightly behind the eye. Note the feathers just to the left of the eye… then look down the body, as the feathers get closer to the lens. Even at f10, there is not much depth of field!
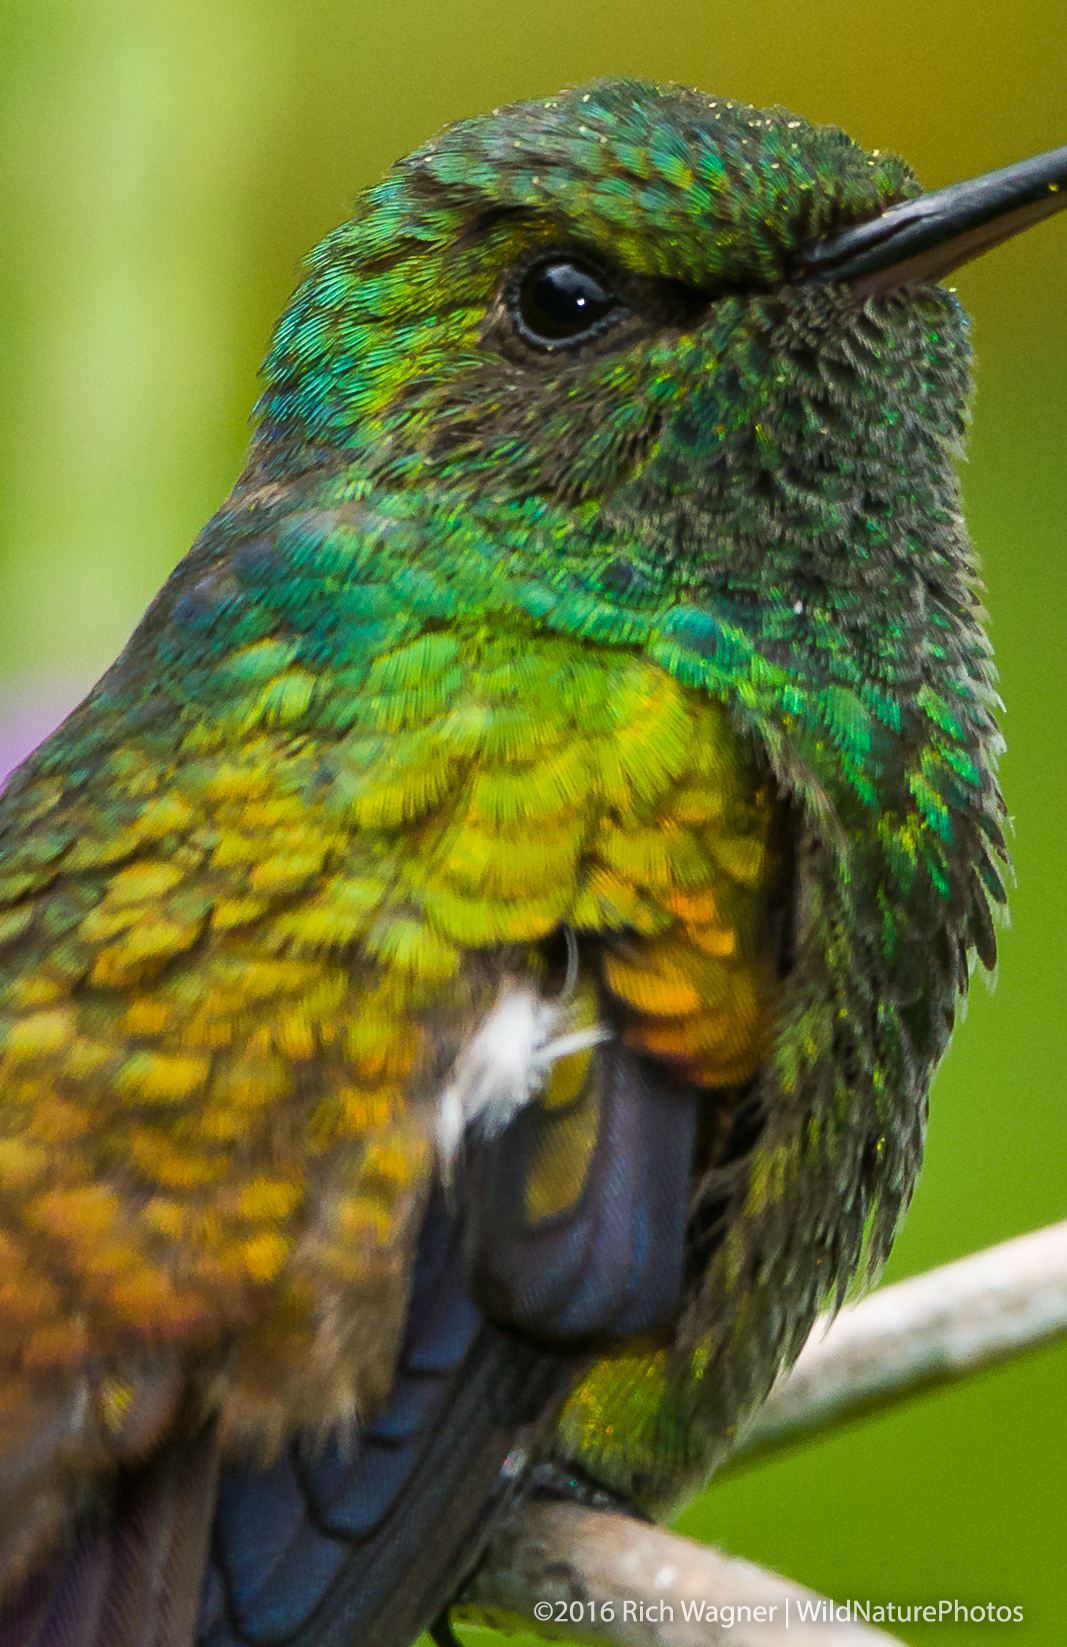
1:1 pixel crop
The lack of sharpness in this shot is dreadful. (Right-click the image for a larger 1:1 crop.) I could have improved this image by increasing the ISO to 1250 and stopping down another 2/3 stop, as well as focusing on the shoulder, instead of the eye, and splitting the DoF in front of and behind that focus point (with the risk that the eye is not sharp). The real problem is that the bird’s pose and the small depth of field at this focal length / distance makes it difficult to keep all the feathers sharp. This is especially true of those feathers closest to the camera, where the viewer’s eye normally looks. So just how small is the depth of field under these conditions? And how do focal length, camera-to-subject distance, and aperture affect the depth of field?
Calculating Depth of Field
There is an easy way to find out how focal length, camera-to-subject distance, and aperture affect the depth of field. The trick is to use a “Depth of Field Calculator” like this one, or my iPhone preference, TrueDoF-Pro.
I created the following chart using TrueDof-Pro and a standard “circle of confusion” of 0.03mm (30 microns) for the Nikon D800/D810, without the diffraction correction. The numbers represent the depth of field (area of acceptable sharpness) in front of / behind the point of focus, measured in inches! I have listed a single point in cases where the distance in front of / behind the focus point are the same. For any given focal length, you can read across the row for a given camera-to-subject distance and see how the depth of field increases with smaller apertures. Note that as the focal length increases, the overall depth of field decreases tremendously. With an 800mm focal length, wide open at f5.6, shooting a subject 20 feet away, the depth of field is only 0.3 inches in front of and behind the point of focus!
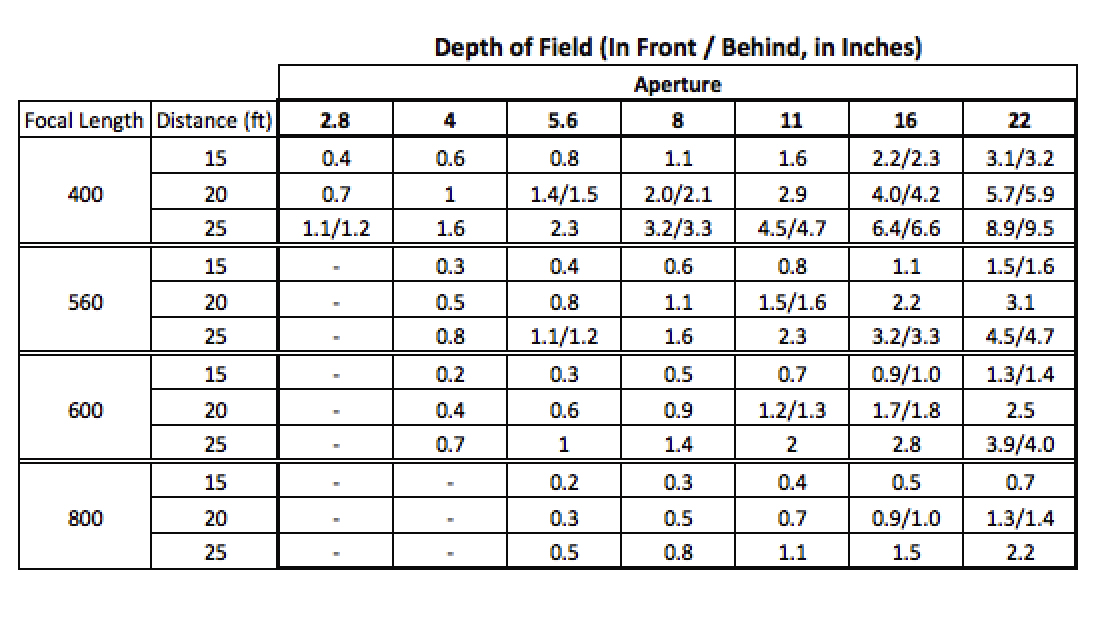
It is useful to look at a graph of the depth of field as a function of focal length, aperture, and camera-to-subject distance. I made the following comparison by graphing the above data. I chose two extremes of focal length (400mm and 800mm), along with the two extremes of distance (15 and 25 feet). It immediately becomes obvious that the benefit of increased depth of field obtained by stopping down diminishes tremendously with longer focal length, and even more so at short camera-to-subject distances. On the other hand, without stopping down at 800mm and with a short camera-subject distance, the depth of field is less than a quarter inch in front of/behind the focus point!

Diffraction and Sharpness
Some authors claim that the effects of diffraction will nullify any improvement beyond ~f8 achieved by stopping down. This is not my real-world experience. There is an excellent discussion of this topic, including an online diffraction limit calculator, available here. Note that diffraction limit is only a best-case scenario when using an otherwise perfect lens. Even when a camera system is near or just past its diffraction limit, other factors such as focus accuracy, motion blur and imperfect lenses are likely to be more significant.
Also, the depth of field equations generally in use are based on assumptions made for internally symmetric lenses, which super-telephoto lenses in the 400 – 800mm range are not. In particular, the so-called “pupil magnification” (P) becomes important with telephotos (and macros). Very generally, telephoto lenses have a P<1, asymmetric macros have a P>1, and symmetric designed lenses have a P=1. When P<1 it acts to increase depth of field. (If you’re shooting landscapes and want maximum sharpness and resolution from the D810 or comparable camera, I recommend this article. If you want the basic math, go here. For short discussions of pupil magnification, see 1, 2.)
Perhaps a better measure is to look actual measured sharpness, using data from DxOMark. DxOMark is the industry standard for camera, sensor and lens image quality measurements and ratings. Perceptual-Megapixel (P-Mpix) is a measure of sharpness. The number of P-Mpix of a camera/lens combination is equal to the pixel count of a sensor that would give the same sharpness if tested with a perfect theoretical optic as the camera/lens combination under test.
DxOMark has specifically tested the Nikon D810 with a Nikon 400mm f2.8 lens. This combination has a Lens Metric Score of 33 P-Mpix for sharpness. This score, compared with the maximum possible of 36.2, is excellent. The sharpness is comparable to a 33 MP camera with a perfect lens, and approximately 3.2 MP are “lost” due to less-than-perfect sharpness. That’s still far and away more that I usually need when photographing hummingbirds. The other measurements they provide are also supportive. Yes, some sharpness will be lost beyond f8 by stopping down, but the final test is the quality of the images that this setup produces. In print, they look great, even when used for two-page spreads.
Putting the Depth of Field Data to Use
So how is this information helpful when in the field shooting?
With relatively short telephoto focal lengths at short distances (~15 ft), stopping down is likely very helpful. With a 400mm lens at f2.8 vs f5.6, the depth of field increases from 0.4″ (in front/behind) to 0.8 inch. At medium distance (~25 ft), stopping down is not as important for depth of field, as f2.8 gives over an inch in front of the subject, which is likely adequate, especially if the subject can be framed in one plane. Even stopping down to f5.6 gives over 2.3 inches of DoF in front of the subject.
With long telephoto focal lengths, like 800mm, at short distance (~15 ft), shooting wide open at f5.6 gives a whopping +/- 0.2 inches of DoF! Tack-sharp focus and ~f16 will be needed to get even a half-inch of sharpness in front of and behind the focus point, which will increase the challenge of getting sharp-looking shots. At longer distances, the situation improves, but stopping down will still likely be helpful. Camera/lens movement at this focal length, especially with relatively slow shutter speeds, can also ruin an otherwise great shot.
Of course, the longer the focal length, the more defocussed and less distracting the background becomes, even with the lens stopped down. The closer the camera-to subject distance and the further away the background, the better, as far as blurring the background is concerned.
Getting It Right
Here are some real-wold examples:
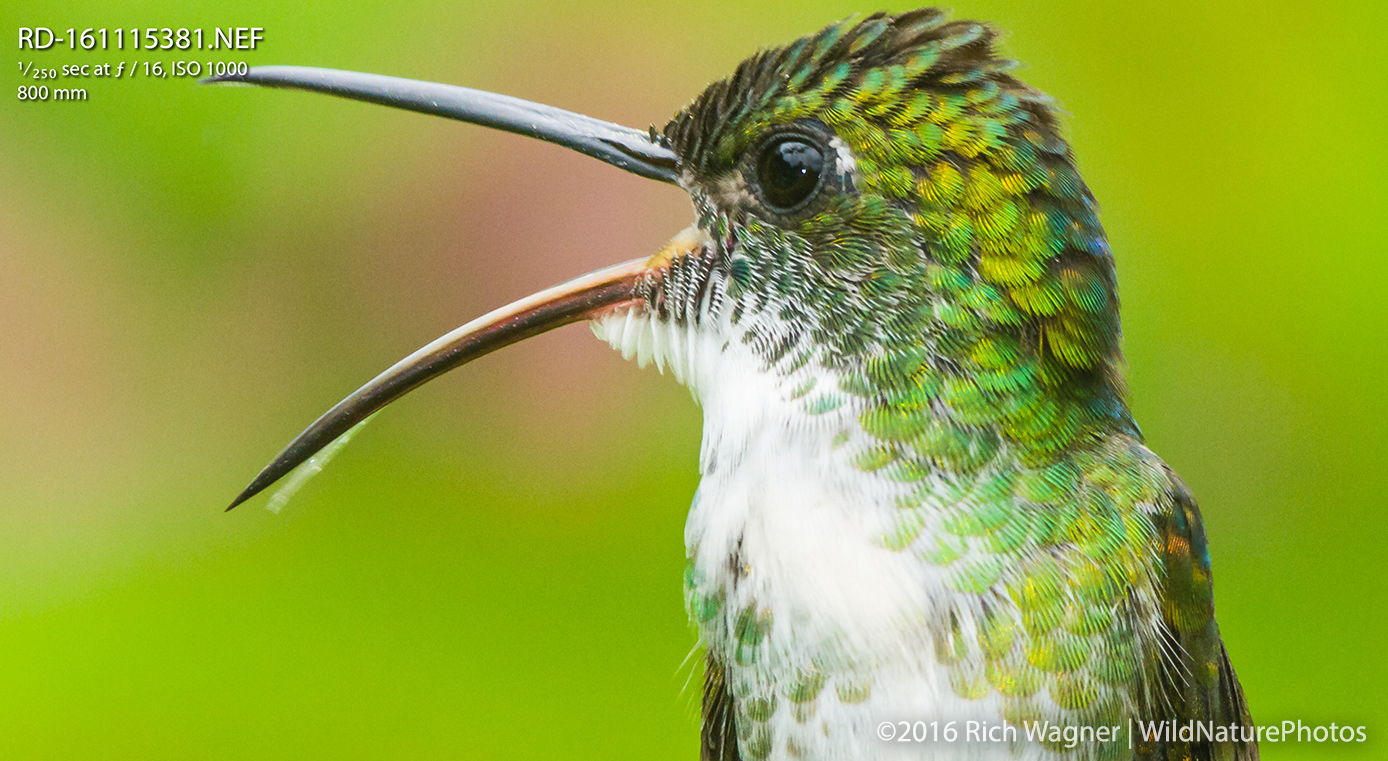
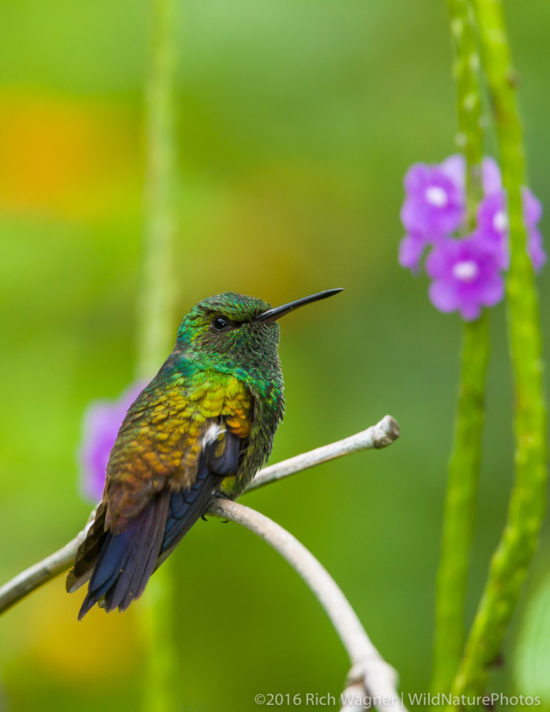
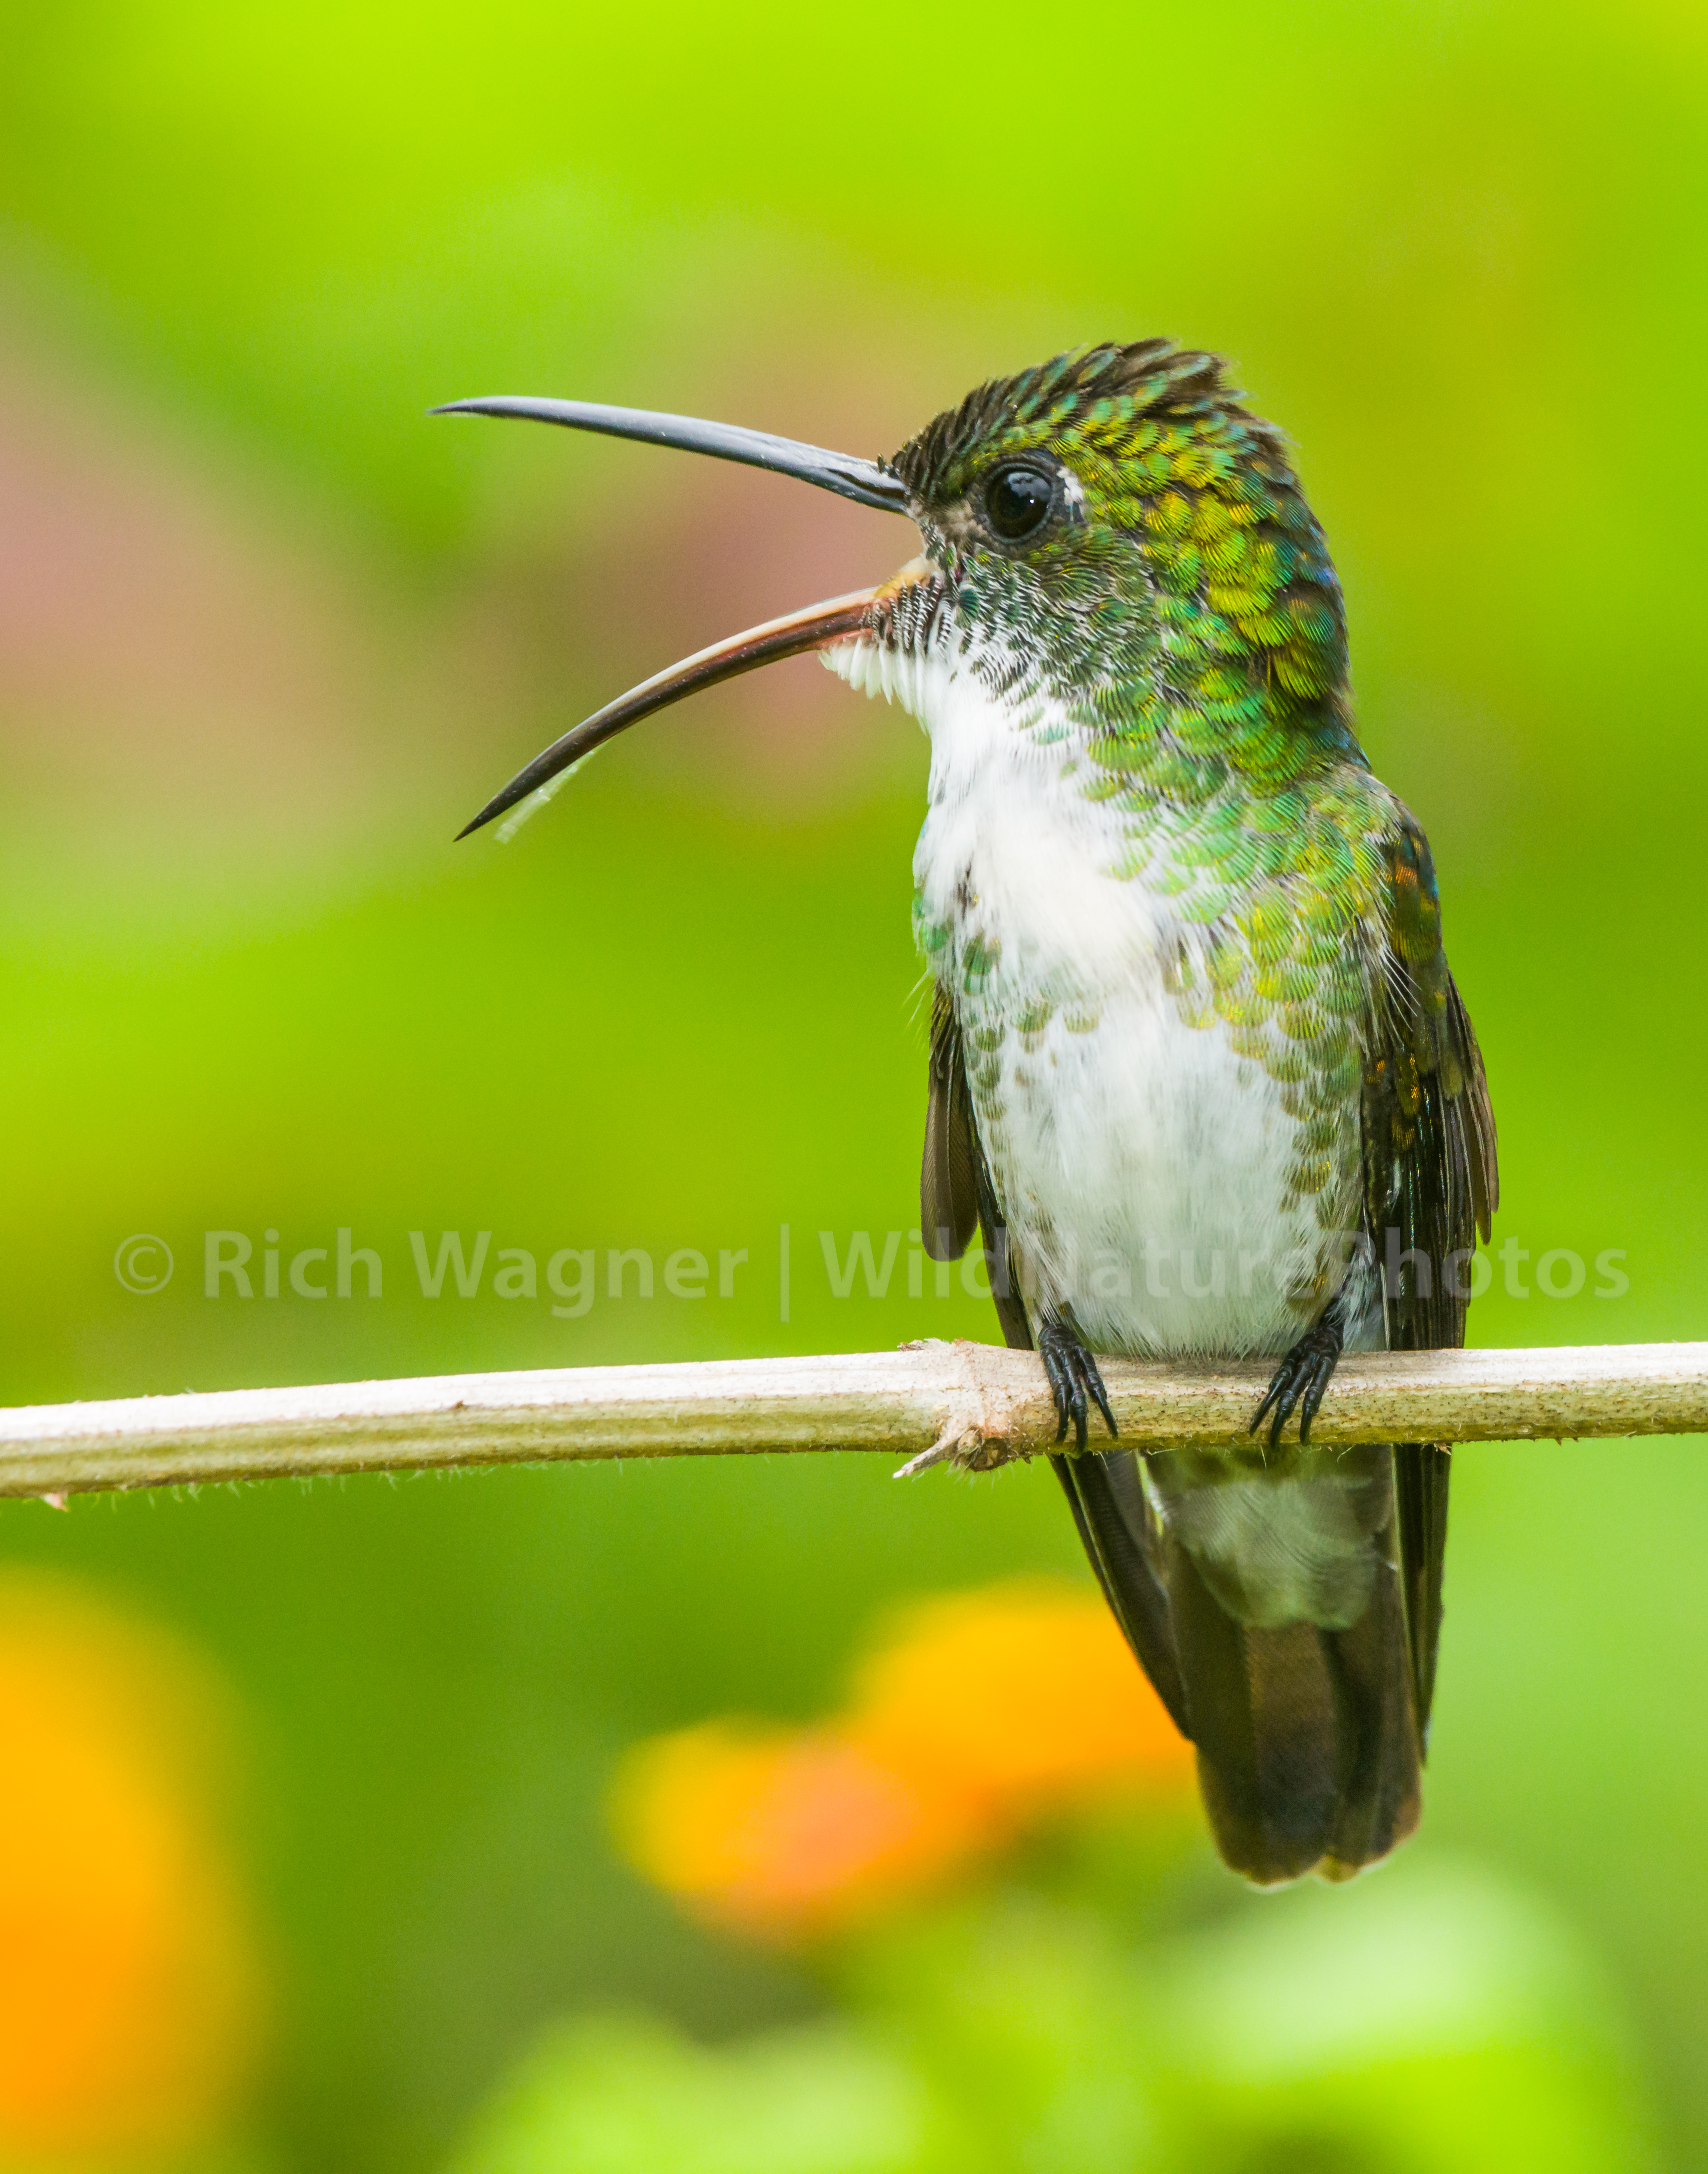
White-chested Emerald (Trinidad)
I photographed this White-chested Emerald at 800mm, 1/250 at f16, ISO 1000, again with balanced fill-flash. The image links to a 1:1 Lightroom screenshot, and a high-res image can be downloaded here (6MB) to view sharpness at 1:1 magnification. With action, subject motion can blur the shot, resulting in the need to compromise between faster shutter speeds vs. increased depth of field. I opted for 1/250 second, hoping to freeze any motion. Note the sharp white breast feathers resting on the bird’s left shoulder. Diffraction clearly did not ruin this shot, nor did Nikon’s 2X teleconverter on the incredibly sharp 400mm f2.8 lens.
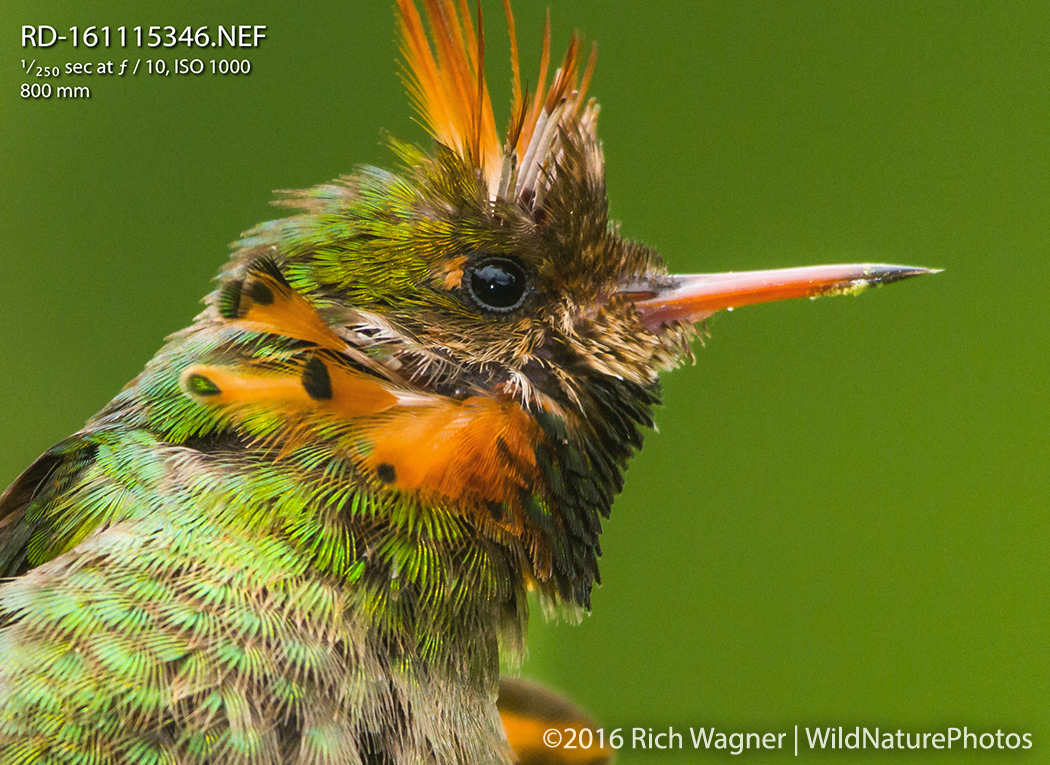
Tufted Coquette, Male (Trinidad)
The Tufted Coquette is the second-smallest bird in the world – second only to the Bee Hummingbird that is endemic to Cuba. Males like this one weigh about 2.25 grams, less than the 2.5 gram weight of a penny! This male is about 2.75 inches from tip of bill to tip of tail. I took these shots with a focal length of 800mm, at /250 sec at f10, ISO 1000 from about 15 feet. My first challenge was to find a favored perch of this immature male, and then position myself where I had a decent background when he returned. Balanced fill-flash was essential to make his color pop from the background. The image again links to a Lightroom 1:1 screenshot.
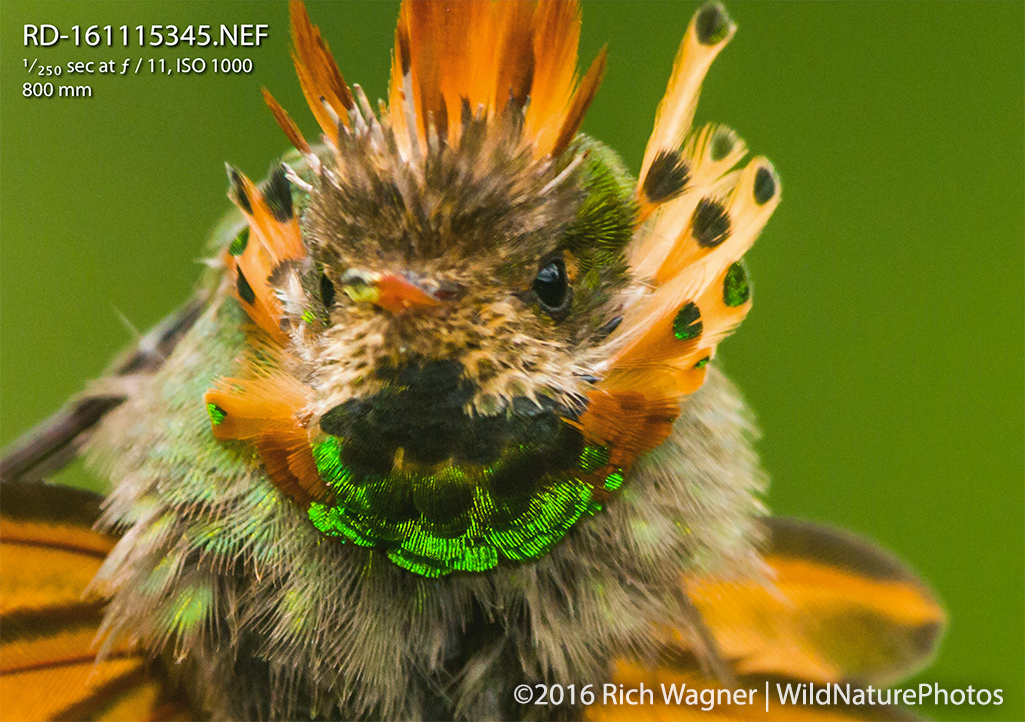
Tufted Coquette, Male (Trinidad)
Another shot, at 800mm, 1/250 sec, f11, ISO 1000. The image link to the 1:1 Lightroom screenshot of this male shows the new tuft feathers that are still in white sheathes. Females of this species have a buff-colored chest and no tuft feathers. Because the bird was leaning forward in this shot, the head became closer to the camera, and the tail further away. The focus distance on the face also changed, and became closer to the camera. Careful observation shows that the tail is (predictably) slightly more out of focus because of the shallow depth of field.
Strategies
- The longer the focal length that is being used (from the same distance), the greater the need to stop down to maintain adequate depth of field. Higher magnification goes hand-in-hand with smaller depth of field. That means slower shutter speeds and the need for rigid camera support. In low light, slow shutter speeds are obviously a problem, and supplemental light may be needed to obtain good results. Supplemental light also helps improve contrast.
- Camera-to-subject distance has a dramatic effect on depth of field when shooting with telephoto lenses. Be aware of this if shooting at the closet focus distance possible for the lens / focal length.
- Shooting “side-on” shots where most of the subject is in one plane will help create the appearance of sharpness and depth of field. “Over the shoulder, looking back” shots do the opposite. In the latter case, focus on the eye results in the part of the subject closest to the camera being unsharp. Thinking about the “plane of focus” instead of the “point of focus” will help you anticipate what will be soft or out of focus.

Tags: Copper-rumped Hummingbird, Depth of Field, Hummingbird Photography, Telephoto, Tufted Coquette, White-chested Emerald
Excellent reference article and superb examples Rich. Thanks very much for this.
Thanks, Mark!